Sunday, September 26, 2010
Sick today, no info
Just a short note, feeling a bit sick today so I wont have time to write an informative post, will start back up again tomorrow. Hope everyone is still following and viewing my blog.
Saturday, September 25, 2010
Resistor Color Code
Short post today about resistors and the color codes that go with them.
When looking to size resistors for a project this chart below is great to have around or even memorized.

Here is how to read this chart, starting from left to right. You will know which side is which because the right side either has a gold, silver, or no band.
The first two colors are the first two numbers in the resistor and the third band is the the multiplier that tells you the size of the resistor. The last band on the far right is the tolerance of the resistor.
Example: Say you have a resistor that is Brown, Red, Orange with a silver band at the end. You go to the chart, see the brown is 1, red is 2, and orange is 3, or multiply by 1000. The silver band is a 10% tolerance + or - on the resistor. So the resistor becomes 12, multiplied by 1000, so 12000 or 12K ohms with 10% tolerance + or - so it could read anywhere from 13200 ohms to 10800.
The way I learned to read the third band is thats how many 0's you put at the end after getting the first two. Another example with how I read it. Orange, Orange, Green. So that would be 3,3, with 5 0's or 3300000 ohms.
Learning to read and use this chart is great when you need to see what the size of a resistor is and you don't have an ohmmeter around to check
A great way to help remember the color code order is to memorize this sentence
Bad Black-0
Beer Brown-1
Rots Red-2
Our Orange-3
Young Yellow-4
Guts Green-5
But Blue-6
Vodka Voliet-7
Goes Grey-8
Well White-9
Get Gold-5%
Some Silver-10%
Now None-20%
Friday, September 24, 2010
Series and Parallel circuits
I mentioned in my last post the schematic I drew was that of a series circuit. But what exactly does that mean?


To have current flow in a circuit there must be a complete path of current from negative to the positive end. When components are connected in series it makes it so that if any one of the components or wires is removed from the circuit, current flow stops completly. Example below with my other image.
Series circuit and path of current:
In this first circuit you can see current can flow from the negative to the positive end freely in a complete loop.
Now with a wire missing:

As you can see here, we removed one wire from one end of the lamp and current does not have a continuous path to flow so you get whats called an open circuit. Your lamp would not light and your circuit would not work.
Now lets take a look at how a parallel circuits. A parallel circuit is one with multiple branches of electricity flow so that if one branch is taken out there is still electrical continuity in the circuit. Here is an example and an explanation.
A parallel circuit and how current flows through it:

As you can see in the above image current flows through all three branches at onces and meets back up at the branch with the light bulb. Now lets break one of the connections and see if we still have continuity

Even with the middle resistors lead broken we still have two complete paths of current flow from the first branch and the last branch.
You can see why you would want your wiring in your house to be in parallel with each other and not in series. Imagine one lightbulb going out and having your house wired in series, the entire flow of electricity in the house would be stopped.
Parallel circuits are nicer and easier to troubleshoot in my opinion. If you have any questions post them in the comments. I will go over how to measure values in both series and parallel in the next post.
Schematic Diagrams
Being able to read and understand schematic diagrams is an essential part of working as an electronics technician or when working with any sort of DIY project that involves wiring.
Schematic diagrams are pictorial representations of how the circuit is wired and how connections are made. The symbols do not always look like their real life counterparts but it makes it much easier to draw a schematic symbol than something that resembles the actual component.
Here are some common schematic symbols as well as what the component looks like in real life
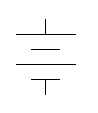
Battery:


Schematic diagrams are pictorial representations of how the circuit is wired and how connections are made. The symbols do not always look like their real life counterparts but it makes it much easier to draw a schematic symbol than something that resembles the actual component.
Here are some common schematic symbols as well as what the component looks like in real life
Battery:


The longer line up top is the positive connection and the smaller line on bottom is the negative connection. I'm sure we all know what a battery looks like in real life and that 9 volt up there is just one example
Resistor:


Resistors don't have a negative or positive lead and can be connected either way, resistors come in varying sizes of resistance that are indicated by the color code of the resistor, I will go into the resistor color codes in a future post.
Incandescent light:


Lets hook these up and see how they would look in a schematic symbol

Here we have the battery hooked in series with the resistor and the lightbulb. When I say in series I mean that if any of those connections was to be open the entire circuit would cease to operate. I will cover series and parallel circuits in a future posting as well.
These are just a few of the probably hundreds or even thousands of different schematic symbols there are out there and I will cover more complex ones in future postings.
Thursday, September 23, 2010
Voltage Resistance and Current
I'm going to take this post to explain just what voltage is and how it relates to circuits.
 <--Omega

Voltage is defined as a the measure of the push on each electron as it moves through the wire.
A nice analogy I heard to think of voltage is to think of water going down a hose, the pressure of the water in the hose can be thought of as voltage, the more pressure you apply the faster it goes through the hose and the more voltage you have the faster the electrons move through the wire. Voltage is measured in Volts abbreviated V or E depending on what circuit you are working with.
Resistance can be thought of as how easily the water is able to flow through the hose. The bigger the hose the easier it is for the water to flow through. Likewise, the less the resistance in a circuit the easier it is for electrons to pass through. Inveresly if you make the hose smaller in diameter you decrease the speed at which water can pass through the hose at a given pressure. Think of that as increasing resistance in a circuit, the more resistance the less the electrons are able to flow through the circuit.
Resistance is a nice intuitive word since it just means to resist the flow of current and its right there in the name. Resistance is measured in Ohms which is symbolized either with R or the greek capital letter Omega.
 <--Omega
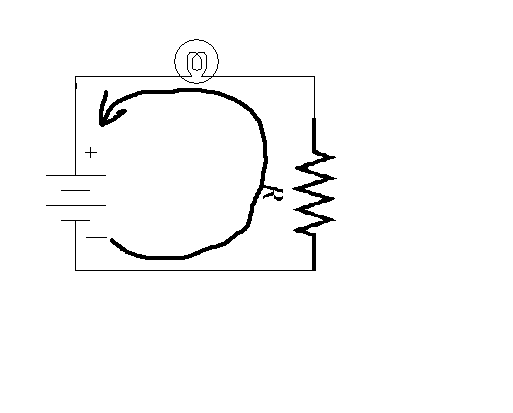
Current in a circuit can be thought of as the amount of water flowing past a certain point every second. It takes around 6.241 × 10¹⁸ electrons passing a given point each second constitutes one ampere. You don't really need to know that it is that many electrons just remember that an Amp is a measure of the amount of electrons passing through in a given amount of time. Current is measured in Amps abbreviated either A or I.
Here's a sample circuit that shows where they fit in to a layout and how they are calculated.

Ohm's Law
Ohm's Law is a huge part of learning about electronics, when you are calculating the different voltages, resistances, current, and power of a circuit, you go to your handy dandy wheel of ohm's law pictured below.

First, what is Ohm's Law? Wikipedia has this to say, Ohm's law states that the current through a conductor between two points is directly proportional to the potential difference or voltage across the two points, and inversely proportional to the resistance between them.
Now, personally I never really learned what it says I just learned how to use the chart above. When trying to solve for an unknown in the circuit and you have at least 2 knowns you can go to your chart, look at what you are trying to solve and use the formula that matches your two knowns.
For example: say I know that my resistance of the circuit is 100 ohms and the voltage in my circuit is 12 volts, going to the chart and looking in the beige shaded green shaded area since I am looking to find current(amps) I see that the formula that uses both ohms(R) and voltage (V) is I=V/R or Voltage divided by the resistance gives you current.
For now get a feel for what this chart looks like and how to use it. I will go into more detail about what ohms, voltage, current, and power mean at a later time.
If you'd like to try some sample problems to get familiar with the chart try out these.
Find:
I when V= 12volts and R=120 Ohms
R when I=2amps and V=6 volts
V when R=200 Ohms and I=6 amps.
Feel free to put the answers in the comments section and e-mail me if you have any questions.
So what is Electronics Technology?
When I first started high school I enrolled in their electronics cluster program so for 4 years I learned about electronics. Basically anything you see around you today that uses electricity can be explained through the rules of electronics, some more complex that I wont get into and some as simple as a battery powering a light bulb.
Electricity is the movement of electrons in a wire that create an electrical potential known as Voltage. Voltage can be abbreviated either as V or E.
For my blog I will mainly talk about DC circuits at first, listing some components and try to teach how to read a schematic diagram. Let's start with some of the basics.
Subscribe to:
Posts (Atom)